DSR_ROBOT2 Python Library Tutorial
Overview
This tutorial provides an overview of the DSR_ROBOT2 Python library and instructions on how to use it for robot control.
The DSR_ROBOT2 library offers a high-level Python interface for controlling Doosan robots within the ROS 2 ecosystem.
It is designed to simplify robot manipulation by providing a user-friendly API for motion control, configuration, and communication.
Architecture
The DSR_ROBOT2 package acts as a ROS 2 wrapper, enabling robot control through Python scripts.
The architecture is composed by the following layers:
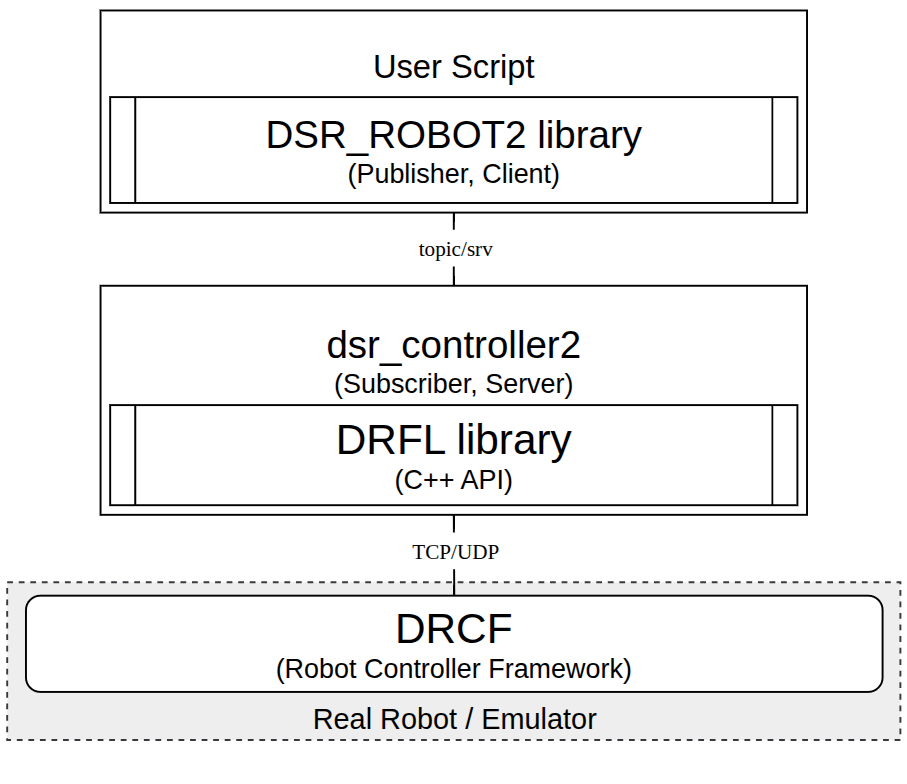
DSR_ROBOT2 (Python Interface): Publishes commands via ROS 2 topics/services and interacts with dsr_controller2.
dsr_controller2: Translates ROS 2 service and topic commands into calls to the Doosan robot control library (DRFL).
DRFL (Doosan Robotics Framework Library): C++ API for communicating with the robot controller software.
DRCF (Doosan Robot Controller Framework): The low-level controller running on the robot or emulator.
Quick Start
Below is a complete, minimal script to move the robot to a single position. You can save this as a Python file and run it directly after launching the simulation.
import rclpy
import DR_init
import sys

def main(args=None):
    rclpy.init(args=args)

    ROBOT_ID = "dsr01"
    ROBOT_MODEL = "m1013"
    DR_init.__dsr__id = ROBOT_ID
    DR_init.__dsr__model = ROBOT_MODEL

    node = rclpy.create_node('example_py', namespace=ROBOT_ID)

    DR_init.__dsr__node = node

    from DSR_ROBOT2 import movej, posj, set_robot_mode, ROBOT_MODE_AUTONOMOUS

    set_robot_mode(ROBOT_MODE_AUTONOMOUS)

    target_pos = posj(0, 0, 90.0, 0, 90.0, 0)

    movej(target_pos, vel=100, acc=100)

    print("Example complete")
    rclpy.shutdown()

if __name__ == '__main__':
    main()
Setup and Launch
This section explains how to configure and execute basic motion control using the DSR_ROBOT2 interface.
Note
For practical usage, refer to the dsr_example2 package.
1. Initializing the Robot Configuration
Before any operation, you must specify the robot’s ID and model name.
The DR_init module is used to store this configuration.
import DR_init
ROBOT_ID   = "dsr01"
ROBOT_MODEL= "m1013"
DR_init.__dsr__id   = ROBOT_ID
DR_init.__dsr__model = ROBOT_MODEL
2. Setting up the ROS 2 Node
Communication in ROS 2 is handled through nodes. You must initialize the rclpy library and create a node giving the namespace.
This node is then assigned to the DR_init module, enabling the library to communicate over the ROS 2 network.
import rclpy

rclpy.init(args=args)
node = rclpy.create_node('single_robot_simple_py', namespace=ROBOT_ID)
DR_init.__dsr__node = node
3. Importing Robot Control Functions Needed
The core functionalities for robot control, such as movement commands and position definitions, are imported from the DSR_ROBOT2 library.
from DSR_ROBOT2 import movej, movejx, movesj, movesx, movel, movec
from DSR_ROBOT2 import posj, posx
from DSR_ROBOT2 import ROBOT_MODE_AUTONOMOUS
Caution
DSR_ROBOT2 import should come after initializing the ROS 2 node (DR_init.__dsr__node).
4. Setting the Robot’s Operational Mode and Speed
Before sending motion commands or settings, the robot must be set to the correct mode.
ROBOT_MODE_AUTONOMOUS: The robot can be controlled and moved.ROBOT_MODE_MANUAL: For robot settings, such as adding tools to the end-effector.
You can also set default global velocities and accelerations if you want.
set_robot_mode(ROBOT_MODE_AUTONOMOUS)

set_velx(30, 20)    # Set global task speed: 30(mm/sec), 20(deg/sec)
set_accx(60, 40)    # Set global task acceleration: 60(mm/sec2), 40(deg/sec2)
5. Defining Positions
You can define target positions mainly in two primary coordinate systems:
Joint Space (
posj): Defines the angular position of each of the robot’s six joints.Task Space (
posx): Defines the position (X, Y, Z) and orientation (Roll, Pitch, Yaw) of the robot’s end-effector (or tool).
# Joint space position: (j1, j2, j3, j4, j5, j6)
p1 = posj(0, 0, 90.0, 0, 90.0, 0)

# Task space position: (x, y, z, r, p, y)
x1 = posx(400, 500, 800.0, 0.0, 180.0, 0.0)
6. Executing a Motion Command
With a target position defined, you can command the robot to move. The movej function, for example, moves the robot to a specified joint position.
You can override the global speed and acceleration for specific movements.
# Move to joint position p1 with a velocity of 100 deg/s and acceleration of 100 deg/s^2
movej(p1, vel=100, acc=100)
7. Launch and Execute
Setup and build the node. Now you can move the robot as you want.
ros2 launch dsr_bringup2 dsr_bringup2_rviz.launch.py
Run in a new terminal the node you created:
ros2 run <pkg_name> <new_node_name>
# ex> ros2 run dsr_example single_robot_simple
Other Motion APIs
The library provides various other motion commands (e.g., movel for linear motion, movec for circular motion)
to accommodate different application needs.
Check the Full Python API Reference or the links below for more details.